Monday, 11 March 2013
Animation so far:
This is the animation as it stands. The two walks are established and the main turing point, the owner begin pulled by the dog, is established but is not entirely finished. When the owner gets pulled I want to make the head snap back before he is completely pulled forward by the ball. The right arm still needs to be animated as he moves and the left needs to move up and down slightly in time with the ball's movement.
When the owner comes to a stop I have got him to the position where he has stopped moving. Form there I need to get him to rise up into a standing resting position. In my storyboards I planned to have some POV shots of the owner looking at the ball before it shots off in another direction. I have decided instead to keep it all in one shot as the camera work will be more simplistic allowing me to focus more on the quality of animation.

Walking the Dog: Hurried Walk Cycle
Reference Images:
This cycle is more of a run and as such the stride, timing and height will be different for the first walk. the stride is much wider and the legs lift up higher. Because the dog is pulling the owner the arms aren't in a cycle. The right arm is kept back to maintain balance as the left is being kept forward by the dog. This means that the torso doesn't rotate side to side as much. There will be a lot of hip rotation up and down as the dog will be dragging the left side of the body down.

Hurried walk: 20 frames
For the hurried walk cycle shortened the cycle to 20 frames as the character had be almost if not, running as he gets pulled by the dog. this cycle has many problems. I don't like the back and forth bobbing motion so I will make that less emphasised. The hand movement also need work: the left hand will be moving up and down as the ball jumps but this can only be animated once the ball is added to the scene. the right hand moves too much. In my reference video's my dad's arm doesn't move as much- it remains outstretched as he tries to regain his balance.
Hurried walk: 15 frames
This cycle is greatly improved: I made the cycle 15 frames which gives the cycle a greater sense of speed. The torso movement has lessened but there is still some degree of popping which I want to remove. I have not animated the right arm yet. I have decided that I will animate this once I have my character running through the scene and not animate it as part of the cycle.
Wednesday, 27 February 2013
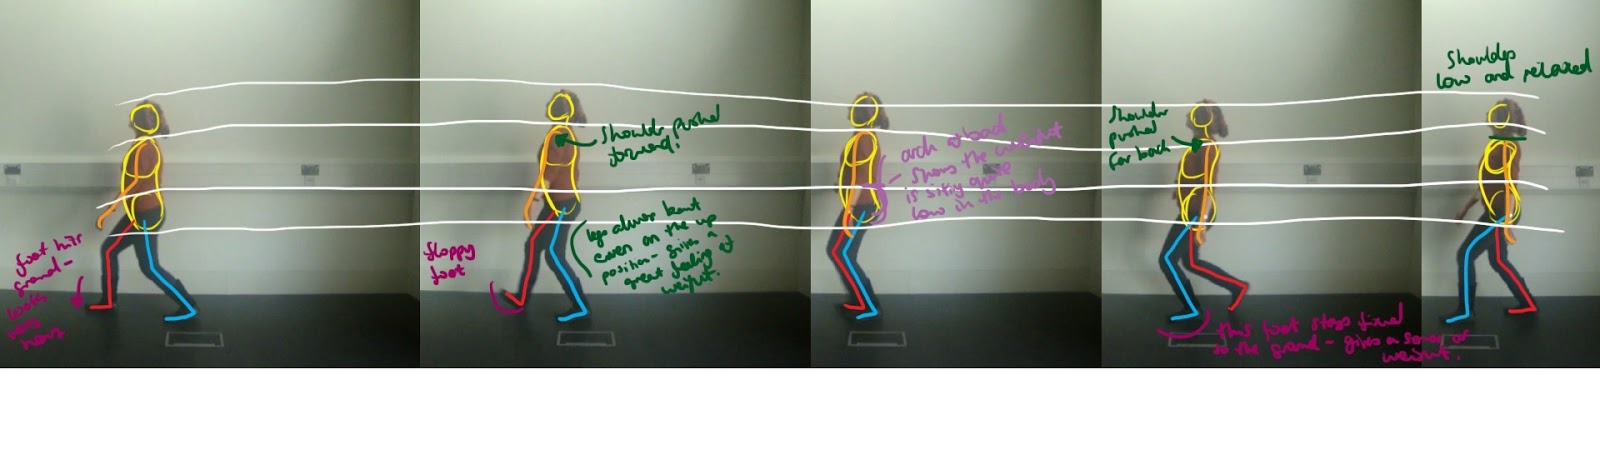
Walking the Dog: Relaxed walk cycle
Reference Images:
The relaxed walk was a mixture of a 'floppy walk' and a walk where my father was interacting with the dog. The weight of the walk will be low in the torso and the walk is mainly lead by the knees. The legs are never fully extended but there are very defined ups and downs.

Take 1: 37 frames
This is my first take for my first walk cycle. The walk is meant to reflect a relaxed, leisurely walk and was to feel weighted. The feedback received form Dan was to have more hip sway, lifting the leg more, exaggerate the ups and down and decrease to side to side sway. Also the part of the body leading the walk is the knees so exaggerating this was also needed.
Take 2: 40 frames
In this walk cycle I took on Dan's suggestions and increased the walk cycle to 40 frames matching my reference video's. The feed back received for this walk was that there needed to be more shoulder rotation as the upper torso doesn't move making it walk look stiff. Also the hand movement was far to exaggerated. I had tried to create a feeling of overlap but the rise of the hand was too exaggerated and needs to be lessened. Alterations have to be made to the legs as well. The right rotates when it moves back, thus giving the illusion of the foot sliding.
Final Relaxed Walk Cycle:
This is the final walk cycle with amendments addressing the criticism above. I've added shoulder rotation which is subtly but is no movement made the walk look very ridged. The hand movement and overlap is not as exaggerated as it was before and subsequently looks far more effective. I also exaggerated the ups and downs but made the body overall sit much lower. This made the knees stick out more, leading the walk.
Animating the Ground Plane:
 In the digital tutors vides to make the rig walk the ground plane was keyed at the beginning and at the end of a cycle and had no keys in between. This produced as straight line on the graph editor and although the feet didn't slide I felt that the walk was to smooth and that the feet needed to be more planted.
To achieve that I keyed the ground plane to make sure the feet didn't move while on the ground. this resulted in many more keys but the walk looked heavier and weighted.
Animating the ground plane:
Sunday, 24 February 2013
Feed Back from Formative:
Following the formative assement were I recived feed bak on my work I decided to make some amendments to my work where it was suggested.
On the first bounce Dan felt that the ball stuck in the air too much. This due to the deformer stretching the ball too much making it look like it was hanging in the air for too long. I changed this by deleting on of the deformer key frames and the ball was deformed less therefore making the bounce look right.
With the ball moving across the plane Dan felt that there were many issues. The arches were too long, the ball hang in the air giving the ball the appearnce that the ball was activly bouncing forward as if it had a mind of it's own. Also the timing of the bounces were incorrect resulting in the ball speeding up at the end and stopping with a bit of a kick.
To solve the problem of the spacing and the timing I went back to my refernce video and took note of when the ball hit the ground using the audio. Once I had keyed in the down positions in Maya I placed the up positions directly in between. This resulted in a much longer bounce and more smaller bounces at the end occuring at the right speed.
To prevent a kick at the end I decided to add a roatation to the ball (and Ramp Lamber to help see the rotation). By adding roataion to the ball as it bounced and came to a stop really made the movement of the ball look much more realistic.
Below is the vidoe of the three balls boucing with the above two balls amended. The benefit of seeing the balls together allows one to see the differenec in the bounce's timing, spacing and weight/ material.
Overall the feed back for this character animation was very good and Dan seemed to enjoy watching the character. The only point which improvment could be pace was the flop of the tail at the end. I had animated the tail as if it was made of light material, imagining the large part of the tail to be made of a lot of hair. Dan however felt that as that was the biggerst part of the tail that it would inded be heavier. As this was the first feed back I'd had form an audience I decided to follow the audiences assumption of tail weight and made the tail heavier. This was simple to amend using the time line, dragging the correct key closer together and then using the snap tool.
The problem with this cycle is that the ball didn't jump high on the passing position. After having done this if felt that the skip had much more energy and pep. I also brought in the feet making them fall close together as I felt that when the were far apart that the weight of the jump was diminished. Furthermore when one jumps and place all their weight on one foot they tend to place their foot under the body to gain maximum stability. By doing this with my skip it felt a more natural way to place the weight.
With the tiptoe style I tried to create, Dan said that the strides of my character where not long enough had to extend further to give a feeling of exaggerated movement. Also to add to this a sense of cushioning in and out as it bobbed back and forth. So by extending the stride of the leg and experimenting with back and forth motion, and a little rotation I feel the rig moves in a more dynamic way and from a profile point of view defiantly feels more like a tiptoe walk.
To create this walk I made one stride take longer than another. This created a slight amount of kicking in the characters left leg. Here there was only the question of changing the timing of the keys, by making them more spaced out, making the stride take longer the kick was removed.
Ball 1: Bouncy ball with a liquid interior
On the first bounce Dan felt that the ball stuck in the air too much. This due to the deformer stretching the ball too much making it look like it was hanging in the air for too long. I changed this by deleting on of the deformer key frames and the ball was deformed less therefore making the bounce look right.
Ball 3: A hard bouncy ball moving across a plane
With the ball moving across the plane Dan felt that there were many issues. The arches were too long, the ball hang in the air giving the ball the appearnce that the ball was activly bouncing forward as if it had a mind of it's own. Also the timing of the bounces were incorrect resulting in the ball speeding up at the end and stopping with a bit of a kick.
To solve the problem of the spacing and the timing I went back to my refernce video and took note of when the ball hit the ground using the audio. Once I had keyed in the down positions in Maya I placed the up positions directly in between. This resulted in a much longer bounce and more smaller bounces at the end occuring at the right speed.
To prevent a kick at the end I decided to add a roatation to the ball (and Ramp Lamber to help see the rotation). By adding roataion to the ball as it bounced and came to a stop really made the movement of the ball look much more realistic.
3 Bouncy balls moving across plane amended.
Below is the vidoe of the three balls boucing with the above two balls amended. The benefit of seeing the balls together allows one to see the differenec in the bounce's timing, spacing and weight/ material.
Ball and Tail
Overall the feed back for this character animation was very good and Dan seemed to enjoy watching the character. The only point which improvment could be pace was the flop of the tail at the end. I had animated the tail as if it was made of light material, imagining the large part of the tail to be made of a lot of hair. Dan however felt that as that was the biggerst part of the tail that it would inded be heavier. As this was the first feed back I'd had form an audience I decided to follow the audiences assumption of tail weight and made the tail heavier. This was simple to amend using the time line, dragging the correct key closer together and then using the snap tool.
Ball and Legs Walk Cycles:
Skipping
The problem with this cycle is that the ball didn't jump high on the passing position. After having done this if felt that the skip had much more energy and pep. I also brought in the feet making them fall close together as I felt that when the were far apart that the weight of the jump was diminished. Furthermore when one jumps and place all their weight on one foot they tend to place their foot under the body to gain maximum stability. By doing this with my skip it felt a more natural way to place the weight.
Tiptoe
With the tiptoe style I tried to create, Dan said that the strides of my character where not long enough had to extend further to give a feeling of exaggerated movement. Also to add to this a sense of cushioning in and out as it bobbed back and forth. So by extending the stride of the leg and experimenting with back and forth motion, and a little rotation I feel the rig moves in a more dynamic way and from a profile point of view defiantly feels more like a tiptoe walk.
Limp
To create this walk I made one stride take longer than another. This created a slight amount of kicking in the characters left leg. Here there was only the question of changing the timing of the keys, by making them more spaced out, making the stride take longer the kick was removed.
Tuesday, 12 February 2013
Formative: Week 6
Ball Tests:
Ball 1: Bouncy ball with a liquid interior
Ball 2: hard ball filled with air
Ball 3: A hard bouncy ball moving across a plane
The above 3 Balls Bouncing a cross a Plane:
These are all of the balls from above placed onto one plane so one can compare difference in timing, spacing and materials the balls are made out of.
http://rebeccameilak.blogspot.co.uk/2013/01/timing-and-squash-and-stretch-test-week.html
Ball and Tail
This is the finished animation as it stands on the Ball and Tail character animation. I found this project very fun as it allowed me to add some humour to my animation especially with anticipation and prolonging action to increase the sense of anticipation. I would have liked to have been able to animate the tail as an animate object instead of being limp as it would have been a good tool of expression instead of using the squash and stretch which I found quite limiting.
Ball and Legs Walk Cycles:
Ball and Legs Tutorial Walk:
I found this tutorial really useful in understanding the key poses for the legs in a walk cycle and also drew my attention to the importance to the position of the feet. Using the graph editor was particularly useful in making the feet stick and achieving a smooth banking side to side motion. What I would like to do next with this rig is to play around with the walk to give it different rhythms and personality as well as experiment with the squash and stretch deformer.
http://rebeccameilak.blogspot.co.uk/2013/02/walk-cycles-week-4.html
Skipping:
This walk cycle was the most difficult one out of the three because the knees kept wobbling. In-between the key frames the knees kept moving about and it was really difficult to find a way to stop them, through changing the key frame values or through the graph editor. This cycle was particularly interesting to do because at the passing position the feet are both of the ground. I also decided to extend the number of frames for the cycle to 27 frames so the ball could have more lengthy bounds.
TipToe Walk:
What defines this walk in the up and down motion as it creeps forward. Only once had I created enough contrast between the two extremes only then did the walk look effective. Unlike any of my previous walk the legs were never fully extended which made the walk fun to do as it allowed sense of compression and realise which gave a feeling of a bounce. With this cycle I decided to experiment with the squash and stench deformed on the ball as I noticed when analysing this walk that as I moved up and down I was squashing and extending my body. Again with this cycle I extended the number of frames to 38 to make the walk look slow, measured and purposeful.
Walking with a Limp:
This was very much inspired by the walk cycle form the Walk Cycle Depot (above). Here I exaggerated the rotation on the right hip in order to lift the right leg off the ground. Here I also experimented with different timings. The right leg takes 25fr to take one step where are the left leg takes 11fr. I decided to do this to exaggerate the limp and give the feeling that the right leg can't take any weight so the left leg has to move quickly to take the weight again.
http://rebeccameilak.blogspot.co.uk/2013/02/walks-with-personality-week-5.html
Digital Tutors Walk Cycles:
DT Male Walk Cycle:
The movement of the upper torso and arms was interesting to do. To create an overlap with the bobbing of the head, chest, back and lower torso all were selected and keyed in to certain positions. Then using the graph editor the key frames where moved along the time line so the keys were out of sync by a frame (see bellow). This showed another fantastic tool the graph editor is and how it can be used to create overlap with a number of components.
Moving the rig from A to B:
As well as the walk cycle the tutorial showed how to make the rig walk forward whilst keeping the timing of the contact positions correct. To create this illusion properly the feet have to stick while the other is moving otherwise it looks as if they are sliding forward instead of pushing it's self forward.
DT Female Walk Cycle:
The four main areas of difference between a male and female walk occur in the arm, knee and feet movement and the hip sway.
- The arms are more turned out so that they don't hit their hips which are generally wider than men's. This main adjustment was done on the passing frames, when the arms go past the hips, on the rotate X axis.
- The Hip Sway was exaggerated by making the hips move further in the X axis in the down and contact positions. This made the hips 'pop' into place but had a stronger movement that the male walk.
- The feet where brought inwards to a more central point and again this was mostly done on the passing position. This made the position of the feet not as wide apart as the male walk. In the male walk at the passing position the foot had moved way from the centre in an almost circling motion. By moving in the feet I felt it helped in exaggerating the movement of the hips.
- The knees like the feet were also made to be more central and closer together and in the down positing are keyed to move inwards even further. This I feel also helps to make the hips pop.
http://rebeccameilak.blogspot.co.uk/2013/02/digital-tutors-walk-cycle-week-4.html
Proposal:
The character interaction I plan to have between the DT rig and the ball and tail rig is that of dog and owner. The nature of the human's walk will start off relaxed, clam head faceing towards the sky, possiably looking around as if the character lost in thought and in't paying to much attention to the dog.
The dog however is very excited jumping around in different diratetions but generally traveling forward. The change of passing happens when the ball starts to move faster in a striagter direction and the poor owner is dragged along. The ball suddenly stops almost causing the owner to fall. The last shot is of the ball shooting of in a side diration catching the owner off balance draging him towards a low angled camera.
Storyboards:

Set Layout Plan:
A street with trees to the right of the characters and houses to the left the character are traveling right to left along this layout plan.
Reference Videos:
Here I have two reference videos one looking at mainly the walk of the owner, both casual and then being pulled by the dog. These videos will provide a reference between the two different walk cycles and their postures.
The second focused on the dog and it's movement. Although I won't be using a four legged rig it still is good reference to understand the dogs body language, especially squash and stretch and the posture/action of the tail.
Human Walk Cycles Reference Video:
Dog Movement and Body language Reference:
Background design:
As I have no experimenc in createing an atmospheric enviorment in Maya yet I want to create the enrioment using image planes or possibaly compositing the animation with an alpha layer into aftereffects with photoshop backgrounds. The background bellow is what I would like the street to look like. In a film bellow that is a quick After Effects test where I have placed my DT walk cycle in front of my background. If I were to take this idea forward I would need to find a way of creating a shadow in Maya using various lights to give the characters a sense of presence in the scene other wise they will look like they are flouting.
Scenery Design:

After Effects Compositing Test:
Walks with Personality: Week 5
To create a walk cycle with personality you have to change the positions/ posture and rhythm of the walk. The image bellow form Richard Williams ' the Animator's Survival Kit' shows changing the posture of the character in the passing position can change the nature of the walk. The walk on the left looks like a very depressed character where are the one on the right is leaning back exposing his chest and gives off a more enthusiastic walk.

Analysing Walk Cycles:
The video bellow is from a web site called Walk Cycle Depot which has a number of different walk cycles. I decide to analyse this particular walk cycle as it had a lot of weight and it's rhythm wasn't even as the other walk cycle I have done so far have been.
http://walk-cycle-depot.blogspot.co.uk/2010/11/ball-chain-walk-cycle.html
Defining a Walk Cycle:
When creating a charcter thtough a walk there are 6 main aspects to remember which I will use the walk cycle above as an example.
Stride: The stride length is different both in timing and in distance. The right leg starts far behind the main body and though it never goes past the shoulder it has a longer stride then the left leg. The left leg, although it could travel further, stay close to the main body to provide an anchor in the passing position Where the character is literally throwing his weight forward. The timing of the strides are also different. The right leg has to drag the weight of the ball and chain so takes longer to move. The left leg however needs to catch the character (4th image- the character is out of balance) and therefore needs to move faster then the right.
Height: The height of the legs are not very high and the walk is more like a shuffle then a march. In most of the positions both feet are planted on the ground and the legs are mostly bent, with the exception of right leg in the 2nd image.
Arcs: This mainly concerns the shoulders and the drops in the walk. In this walk the shoulders start at a low positions and get pulled up and forward before dropping again. It is this repeated pattern that creates an arch in the walks movement. this walk leads through the shoulders, but mostly through the right shoulder. This can be seen as the character moves it forward and then up before he lifts his feet off the ground.
Posture: The posture of the character can also tell us it's personality particularly in the 5th image. This this contact position the back is almost doubled over with very hunched shoulders. The neck is pointing down with the head nestled between the shoulder facing down. The arms are a very good indicator of the characters mood; they hang limp at his side and only move as a subject of overlap or being lead by the shoulders. Over all the posture tells us this character is tired, very low in mood and exhausted.
Twist: The greatest amount of twist happens in the torso but in this walk there is a great deal of twist in the right hip. The right hip has to shift the weight of not only the body forward but also the ball and chain. It starts rotated out showing the pelvis to camera. It then rotates up and then forward and it brings the right leg up and forward into the passing position. It then drops down and comes up again as the left leg moves forward. This heaving motion, which is also created by the right shoulder gives he walk a great feeling of the height being shifted forwards.
Overlap: Overlap happens mostly in the hands and fingers or in any lose item of clothing, accessory or hair the character might have. For this character the only great amount of overlap is in the hand. In the 3rd image the right hand in pointing back to the body but in the next image as the shoulders are dropping the hand is lifted slightly and points away from the body.

Reference Vidoes:
After having analysed the walk cycle above I decided to create my own reference videos and analyse the different aspects of the cycles.
A Normal Walk:

Skipping:

Hunched Over:

Tiptoeing:

Walking with a Limp/Heavy leg:
 Very Floppy/ Relaxed Walk:


Ball and Leg walks cycles using Reference Videos:
Skipping:
This walk cycle was the most difficult one out of the three because the knees kept wobbling. In-between the key frames the knees kept moving about and it was really difficult to find a way to stop them, through changing the key frame values or through the graph editor. This cycle was particularly interesting to do because at the passing position the feet are both of the ground. I also decided to extend the number of frames for the cycle to 27 frames so the ball could have more lengthy bounds.
TipToe Walk:
What defines this walk in the up and down motion as it creeps forward. Only once had I created enough contrast between the two extremes only then did the walk look effective. Unlike any of my previous walk the legs were never fully extended which made the walk fun to do as it allowed sense of compression and realise which gave a feeling of a bounce. With this cycle I decided to experiment with the squash and stench deformed on the ball as I noticed when analysing this walk that as I moved up and down I was squashing and extending my body. Again with this cycle I extended the number of frames to 38 to make the walk look slow, measured and purposeful.
Walking with a Limp:
This was very much inspired by the walk cycle form the Walk Cycle Depot (above). Here I exaggerated the rotation on the right hip in order to lift the right leg off the ground. Here I also experimented with different timings. The right leg takes 25fr to take one step where are the left leg takes 11fr. I decided to do this to exaggerate the limp and give the feeling that the right leg can't take any weight so the left leg has to move quickly to take the weight again.
These studies have been really helpful in improving my analytical skills when looking at a characters walk and will be of great use when designing my own character;s walk.
Digital Tutors Walk Cycle: Week 4
The ball and legs rig was really useful in understanding the positioning of the legs and lower torso in a walk cycle but the next stage was to animate the arms and upper torso. The Digital Tutor's rig allowed me to understand the movement of the upper body and how it's linked the the movement of the legs especially with the overlap in hand and finger movement.

The image bellow shows the 5 key positions using the DT rig. It is very similar the the ball and legs rig with the only difference being the flexibility of the foot. This part of the walk cycle was simple to achieve as all the focus was placed on the leg positions and hip rotation. The hip rotation made the rest of the upper body move but that would be changed in the next stage of the animation process.
 The image above from Richard Williams ' The Animator's Survival kit' show the arms in opposite positions than the legs. This helps counter balance the weight when walking. What the tutorial also showed was not only the side view of the arms movement but also from the front. The arms tend to move in front of the body as they come forward and then move behind if as it moves back. Like the image above I also understood how the hand has overlap when moving; it points back as it moves forward and lags behind pointing up as the arm moves back.
The movement of the upper torso and arms was interesting to do. To create an overlap with the bobbing of the head, chest, back and lower torso all were selected and keyed in to certain positions. Then using the graph editor the key frames where moved along the time line so the keys were out of sync by a frame (see bellow). This showed another fantastic tool the graph editor is and how it can be used to create overlap with a number of components.

As well as the walk cycle the tutorial showed how to make the rig walk forward whilst keeping the timing of the contact positions correct. To create this illusion properly the feet have to stick while the other is moving otherwise it looks as if they are sliding forward instead of pushing it's self forward.
The most useful part of the tutorial for me was using the graph editor. Using the infinity curve is really useful for cycles when cleaning up the tangents and it helps deciding which key frames should be kept and which ones are unnecessary. The graph editors bellow (left wrist, centre of gravity and the left scapular) are examples of a cleaned up graph editor with tidy curves. the infinity curve allows me to see the tangents repeated therefore allowing me to identify if any curves are 'messy'.


The four main areas of difference between a male and female walk occur in the arm, knee and feet movement and the hip sway.

DT walk cycle with only the legs and lower torso animated.
The image bellow shows the 5 key positions using the DT rig. It is very similar the the ball and legs rig with the only difference being the flexibility of the foot. This part of the walk cycle was simple to achieve as all the focus was placed on the leg positions and hip rotation. The hip rotation made the rest of the upper body move but that would be changed in the next stage of the animation process.
Finished Walk Cycle:
Upper Torso and Arm Movement:

The movement of the upper torso and arms was interesting to do. To create an overlap with the bobbing of the head, chest, back and lower torso all were selected and keyed in to certain positions. Then using the graph editor the key frames where moved along the time line so the keys were out of sync by a frame (see bellow). This showed another fantastic tool the graph editor is and how it can be used to create overlap with a number of components.

Moving the rig from A to B:
As well as the walk cycle the tutorial showed how to make the rig walk forward whilst keeping the timing of the contact positions correct. To create this illusion properly the feet have to stick while the other is moving otherwise it looks as if they are sliding forward instead of pushing it's self forward.
DT Walk Cycle:
The Graph Editor:
The most useful part of the tutorial for me was using the graph editor. Using the infinity curve is really useful for cycles when cleaning up the tangents and it helps deciding which key frames should be kept and which ones are unnecessary. The graph editors bellow (left wrist, centre of gravity and the left scapular) are examples of a cleaned up graph editor with tidy curves. the infinity curve allows me to see the tangents repeated therefore allowing me to identify if any curves are 'messy'.


DT Female Walk Cycle:
The four main areas of difference between a male and female walk occur in the arm, knee and feet movement and the hip sway.
- The arms are more turned out so that they don't hit their hips which are generally wider than men's. This main adjustment was done on the passing frames, when the arms go past the hips, on the rotate X axis.
- The Hip Sway was exaggerated by making the hips move further in the X axis in the down and contact positions. This made the hips 'pop' into place but had a stronger movement that the male walk.
- The feet where brought inwards to a more central point and again this was mostly done on the passing position. This made the position of the feet not as wide apart as the male walk. In the male walk at the passing position the foot had moved way from the centre in an almost circling motion. By moving in the feet I felt it helped in exaggerating the movement of the hips.
- The knees like the feet were also made to be more central and closer together and in the down positing are keyed to move inwards even further. This I feel also helps to make the hips pop.
DT Female Walk Cycle:
Subscribe to:
Posts (Atom)