Friday, 10 May 2013

Week 2: Lip Syncing


Lip Syncing: 


To create the basic lip sync is to create using 3 passes. Pass 1 ups and downs for the mouth, pass 2 narrows and wide positions and detail them helps create more exact mouth shapes.  Even though there is a lot of internal movement of the tongue and teeth ( usually some this detail is added in the 3rd pass) when some one speaks most of this movemetn isn't sence so it doesn't have to be recreated. The Muppets is a good example of how simple up and down movement in sync with a voice can be convincing enough movement for lip syncing. 


'You Feeling Alight There Phil?':


This is the first lip sync test I've ever done so found it a very interesting challenge. Do it in 3D means that  the computer creates all the interpolation so the only work is to create the key frames. This I found really hard to do. The timing wasn't an issue because the dialogue provides that but it was deciding what mouth positions go with what sound. Unfortunately due to my dyslexia I found this process very hard to do.


After my first attempt I decided to create a rough dope sheet to help distinguish clearly the shape of the mouth to every letter pronounced. Once doing this I could then figure out where the main keys have to go and I felt that the mouth moved in a more realistic way and fitted the audio more than the first test. Once the mouths movements the rest of the face had to be animated to create a sense of overall movement. This was simply moving the nose to follow the ups and downs of the mouth and then doing the same with the cheeks and the chin.

To help me create the dope sheet I used this sheet which outlines the main positions for most of the letters and sounds. the example to the side shows how some of the letters although are shown to hold one position when in the middle of a word become an in-between letters either side of it. for example the 'N' in 'FINE' is shown with mouth closed but in the word 'FINE' it forms an shape in-between the extreme open mouth forming the 'I' and and the closed 'E'.


I feel that this test is a great improvement for the first but there is still room for improvement. In my first test the mouth movement felt too lose due to not enough keys but the final test might have been to exaggerated. 


Sunday, 21 April 2013

Week1: Morpheus Rig


Morpheus rig:


This is the rig formate before any changes are made. The types of changes that can be made are to the size, shape and features of the characteristics.


A little girl, an old man, and a young man:


The texturing on this face was using one of the textures which came the rig so no alterations was made, I swapped one texture for another.


The Little Girl: The original texture (left) was modified in photoshop. I made it paler, made the checks a dark colour and with freckles. This with blue eyes and urban hair added to the girls character.


The Old Man: The face texture was changed in the same why as the little girl. Here I experimented with adding rings around the eyes. The way the UV texturing works means that some parts of the texture are stretched further than others or in directions which are unexpected. This meant that the establishing the direction of the rings took a couple of tries before I was satisfied with the over all look. 


For the old man I also wanted to change to colour of the eyes, making them blood shot and foggy with cataracts. Unfortunately the public colour is controlled by another part of the rig which refused to change colour so the pupil had to stay black. I also changed the colour of the teeth using a simple lambert.


 Character in poses:


This little exercise allowed me to learn how to use the Morpheus rig and get the characters into different character poses. I had trouble folding the arms of the young man because I originally made them larger so parts overlapped. So I made the arms smaller so they would be easier to move.


Tuesday, 16 April 2013

Modelling Competition: Witch


The character I have decided to design is the witch form the Brothers Grimm 'Hansel and Gretel'. I first started the design process by looking at the traditional depiction of witches but I wanted to give more of a back story to my character: Why was she eating children? The story was set during a period of faming, probably based on the great faming in germany in 14th  century. I wanted to design her to be decreed, physically incapable to feed herself which is why she has to resort to feed on children.


Character Boards:


These panels show the simple design of the witch and images I used as reference in Maya. She has kyphosis: sever curvature of the spine; and arthritic hands and feet. She was a big woman but now she is starving so her ribs are showing and her arms have flesh hanging of the bone.


Witch Built in Maya:


This model was build solely in Maya. 


Witch built in Mudbox. 


I first made the basic mesh for this model in maya and then exported it into Mudbox where I added more detail to the mesh to allow for more detailed modelling.


Wednesday, 13 March 2013

Final Submission:


Walking the Dog:

Final animation incorporating two walk cycles and a ball and tail.


Ball and tail:

Ball and tail inteacting with it's environment


Walk Cycles:

Ball and Legs walk cycles; normal, limping, skipping and tiptoeing, and Digital Tutors walks; male and female.


Bouncy Balls:

3 different weighted balls bouncing across a plane:
     red and yellow ball- hard bouncy ball
     white ball- filled with liquid
     red and blue ball- hard ball filled with air (basket ball)


Monday, 11 March 2013

Animation so far:


This is the animation as it stands. The two walks are established and the main turing point, the owner begin pulled by the dog, is established but is not entirely finished. When the owner gets pulled I want to make the head snap back before he is completely pulled forward by the ball. The right arm still needs to be animated as he moves and the left needs to move up and down slightly in time with the ball's movement.

When the owner comes to a stop I have got him to the position where he has stopped moving. Form there I need to get him to rise up into a standing resting position. In my storyboards I planned to have some POV shots of the owner looking at the ball before it shots off in another direction. I have decided instead to keep it all in one shot as the camera work will be more simplistic allowing me to focus more on the quality of animation.

Walking the Dog: Hurried Walk Cycle

Reference Images:

This cycle is more of a run and as such the stride, timing and height will be different for the first walk. the stride is much wider and the legs lift up higher. Because the dog is pulling the owner the arms aren't in a cycle. The right arm is kept back to maintain balance as the left is being kept forward by the dog. This means that the torso doesn't rotate side to side as much. There will be a lot of hip rotation up and down as the dog will be dragging the left side of the body down.


Hurried walk: 20 frames 


For the hurried walk cycle shortened the cycle to 20 frames as the character had be almost if not, running as he gets pulled by the dog. this cycle has many problems. I don't like the back and forth bobbing motion so I will make that less emphasised. The hand movement also need work: the left hand will be moving up and down as the ball jumps but this can only be animated once the ball is added to the scene. the right hand moves too much. In my reference video's my dad's arm doesn't move as much- it remains outstretched as he tries to regain his balance.

Hurried walk: 15 frames


This cycle is greatly improved: I made the cycle 15 frames which gives the cycle a greater sense of speed. The torso movement has lessened but there is still some degree of popping which I want to remove. I have not animated the right arm yet. I have decided that I will animate this once I have my character running through the scene and not animate it as part of the cycle.

Wednesday, 27 February 2013

Walking the Dog: Relaxed walk cycle


Reference Images:


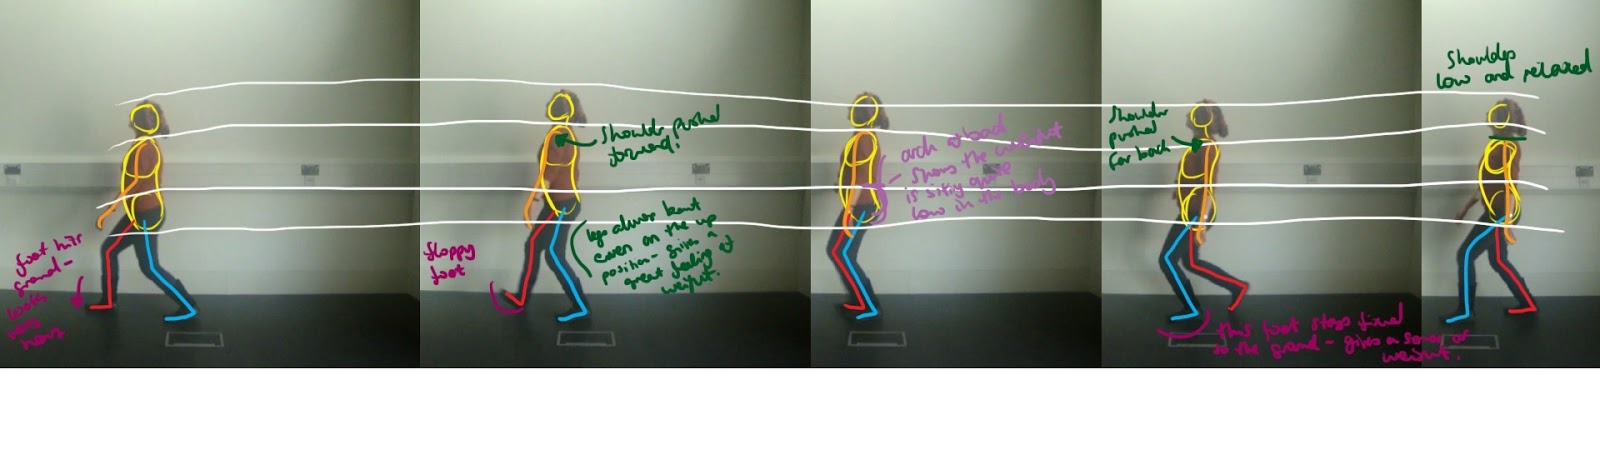
The relaxed walk was a mixture of a 'floppy walk' and a walk where my father was interacting with the dog. The weight of the walk will be low in the torso and the walk is mainly lead by the knees. The legs are never fully extended but there are very defined ups and downs. 


 This walk was a little too stiff for the walk I had in mind. However I liked the posture of the torso and the position of the left arm provided useful reference as to the posture of someone when walk a dog.


Take 1: 37 frames


This is my first take for my first walk cycle. The walk is meant to reflect a relaxed, leisurely walk and was to feel weighted. The feedback received form Dan was to have more hip sway, lifting the leg more, exaggerate the ups and down and decrease to side to side sway. Also the part of the body leading the walk is the knees so exaggerating this was also needed.

Take 2: 40 frames


In this walk cycle I took on Dan's suggestions and increased the walk cycle to 40 frames matching my reference video's. The feed back received for this walk was that there needed to be more shoulder rotation as the upper torso doesn't move making it walk look stiff. Also the hand movement was far to exaggerated. I had tried to create a feeling of overlap but the rise of the hand was too exaggerated and needs to be lessened. Alterations have to be made to the legs as well. The right rotates when it moves back, thus giving the illusion of the foot sliding.

Final Relaxed Walk Cycle:


This is the final walk cycle with amendments addressing the criticism above. I've added shoulder rotation which is subtly but is no movement made the walk look very ridged. The hand movement and overlap is not as exaggerated as it was before and subsequently looks far more effective. I also exaggerated the ups and downs but made the body overall sit much lower. This made the knees stick out more, leading the walk.


Animating the Ground Plane:


In the digital tutors vides to make the rig walk the ground plane was keyed at the beginning and at the end of a cycle and had no keys in between. This produced as straight line on the graph editor and although the feet didn't slide I felt that the walk was to smooth and that the feet needed to be more planted.

To achieve that I keyed the ground plane to make sure the feet didn't move while on the ground. this resulted in many more keys but the walk looked heavier and weighted.


Animating the ground plane: