I have learnt a lot about the work flow process of an animation and how each stage leads to the next, which at the beginning of the term I wasn't sure about. working through the different passes, from stepped to linear, to spline was a simple way of working and was really intuitive way of working. I would like to have more tutor contact at the last stages of the animating process, to receive feed back but also make sure that everything polished off nicely. Out of all the stages i feel that this part was my weakest and subsequently i feel that my animation has more potential and could be improved.
Overall I found the experience, all be it frustrating at times, simple and we were given time to just work which allowed me to experiment and play around with depicting a character and story telling. I also liked the fact that I could use a skilled actor for my reference instead of using my own, limited acting skills. I felt this really influence my animating process.
If I were to complete this process I would have liked to have got to the final stage earlier so that I could have more time to polish off the performance and add extra small movements which I felt really improved the performance between my first take and my final submission.
This was my first full take of the animation. Although I think it works well over all I wasn't happy with it. The eyes needed more animating- they felt too still and therefor dead. I don't feel that they should move around more but the skin around them should move more.
I also felt that the last shot didn't work well. I decided to lengthen it making both characters breath, especially Shylock as he, for my animation, just finished a big out burst. It also allowed me to show a little more action and reaction between the characters.
In a previous post I made mention to Glean Keane and how in one of his tutorial he was stretching the neck of one of his characters. I decided to use this type of exaggerated animation for Salarion's reaction to Shylock's sudden lunge forward.
I stretched the neck by moving the shoulder as I decided that the move backwards would be lead by the shoulder. The head then moves past the shoulder before stealing above the shoulder. I though that this created a good reaction to Shylocks actions and created a lot of overlap with the head and arms.
This part of the animation process involved many areas of change:
The body movements in the previous pass were still very even as the computer was completing all the in-betweens. I had to favour possesses creating uneven spacing when the body moved form one pose to another. As you can see in the graph editor big changes are anticipated or processed with a lot of key creating easing in and out of poses making the movement not so steeped.
Also as part of this process I deleted extra keys and changed come of the curves in the graph to have smoother animation where needed.
I also worked heavily on the facial animation, working on the mouth, moving the nose and cheeks in relation the the mouth movement and the eyes. I added so extra eye movement when he looks down to make him look like he's think and not just saying something. The diagram bellow shows that down cast eyes are an indication of emotional involvement which is what i wanted to convey. I also made the eye movement from looking down to looking at the other character more snappy to give the impression the eyes are flicking about.
This further pass was tightening up the animation making sure that the character flowed smoothly from one pose to another without an glitches. As can be seen in the graph editor I added some easing in and out of poses and quicken some of the movements.
The next stage will be to create more overlap with the arms and head movement and some anticipation of movement. To help me understand this I looked at Gleen Keane's tutorial on how to anticipate movement. his style was very exaggerate, such as stretching the characters neck. I decided not to go that far with my mine as I want to keep my animation subtle. The reason why I want to keep a subtle realistic look is due to the content of the dialogue, it doesn't lend itself to comical exaggerated animation.
I decided to use Al Pacino's performance as a reference for my animation as it is far better material to copy than my own performance. Pacino's performance was a good reference for the overall body movement as well as the facial expression and lip movement.
In terms of body movement for this part of the dialogue, he moves slowly shifting his weight from one side of his body to the other when he changes positions slightly. He also moves towards camera slightly as he starts to talk which i have also incorporated into my animation.
When Pacino speaks he doesn't always look at the other characters. He looks down when saying 'if it will feed nothing else...' and look back saying ' it will feed my revenge'. This I felt was really powerful as it exaggerated the words said as he looked up. Also the way Pacino speaks he exposes his bottom teeth, moving his chin/ jaw and bottom lip when speaking. This really influenced how i moved my character and felt it gave some individual characteristics to my character.
In this part of the animation I changed the animation form stepped to spine (although I know know that I should have gone to liner first but i found the process i used worked well for me). here my main concern was holding the key poses and getting the timing with the words. the reference of Pacino helped as i could see when he moved in relation to when he spoke.
To show the process I went through i'm going to focus on test and the developmental stages of just one part of the animation.
Shylock: To
bait fish withal. If it will feed nothing else; it will feed my
revenge.
Internal
Pace and Rhythm:
Shylock
has just turned around to face the man who has just spoken. He rises
out of a resting position and moves slowly towards the other
character, the camera and audience. His movements are slow and
purposeful. He has many pauses as he thinks things through. Unlike
the rest of the dialogue he doesn't always look at the character. He
looks down at the floor as he collects his thoughts at the start of
sentences.
Emotional
Need:
He's
justifying his need for a pound of human flesh and even though his
words are dark he is not yet angry. He is filling his emotional need
to express his views and shows the audience that his anger come form
somewhere deeper. However looking at Al Pacino's interpretation he
doesn't appear sad- more deep pondering, a calm before the storm.
Posing:
These are the key poses for this piece of dialogue. Working in some feed back from my formative I have kept his body language opens the character is trying to express himself as a posed to closed body language which is more linked with a shy nature. The red lines show the flow lines of the body and the yellow show how the lines of the body, particular the arms lead the eye up to the characters face and eyes.
The first stage of the animation is done on stepped animations as this helps establish posing and initial timing. I decided to create my key poses on operative words in the dialogue where the character would place the greatest emphasis. For example the movement of the head upwards was done to emphasis the words 'my revenge'.
Animating to Camera:
I decide the best way to create strong poses was by animating to camera. I set up the camera I was going to render out of at the right aspect ration and placed a render gate so I could see what would appear in shot. Using this two window set up I could navigate in perspective and change my poses in there but be able to see how that looked to the camera. This allows me more flexibility as some poses might cause some pinching but it that didn't appear on camera and created a strong pose then I don't have to worry about it.
I received some good feedback form the formative and also some alterations and some suggestions.
I look at a number of interpretations of this part of Shakespeare play, two which I posted but decided to stay close to the version my dialogue was taken form.
I particular like the way the camera framed Shylock as he moved around. Dan suggested that as the character builds up a crescendo that he could move closer to camera. I like this suggestion as it fits the dialogue and his movements will emphasis the rise in voice tone.
I will also make changes to the timing of one of my cut aways. the last shot was originally going to show Shylock lunge forward invading Salarino's personal space after say his last line. I have now decided to change that so he moves forward as Shylock says his last line 'I am a Jew'.
I also decided to remove the extra character from the second shot as he doesn't say anything nor appear further on in the animation or add to the overall narrative or performance. Without having an extra character to animate I can focus more on the key characters in the performance.
Animation Schedule:
With the confirmed deadline extension this is now my schedule for the animation. the blocking and secondary animation (which will involve facial expression and lip sync). the last part will be a clean up process, removing extra keys, phasing, micro movements and eye and lip movements.
My dialogue is taken from the film adaptation of Shakespeare's 'The Merchant of Venice' (2004) directed by Michael Radford, with Al Pacino taking on the role of Shylock. The extract I have chosen is form Act 3 Scene 1 and is a duration of 36 seconds. The video clip below shows the two minute speech but I will only be animating the first 36 seconds.
The Transcript:
SALARINO:
I'm sure if he forfeit, you will not take his flesh,-
what's that good for?
SHYLOCK:
To bait fish withal-if it will feed nothing else,it will feed my revenge; he hath disgraced me, and hindered me half a million, laughed
at my losses, mocked at my gains, scorned
at my nation, thwarted
my bargains, cooled my friends, heated mine enemies; -and
what's his reason? I am a Jew!
Sequence Break Down:
I've decided to only have three different camera angles throughout the sequence closely mimicking the shots used in the film. I have decided to do this as much of the audiences focus will be on Shylock and the way Al Pacino moves around in the space on screen is very effective and adding more shots might cloud the performance.
I have decided to add on extra shot at the end of the speech to finnish the sequence. It will be a medium long shot showing the top half of Shylock and Salarino showing Shylock invading Salarino's personal space. The bright red line shows the midway point of the shot and the darker line shows how far Shylock has gone over that divide. The reason I have decided to compose the shot like this is to show the intercharacter dynamics between Shylock and Salarino.
Shylock Character Analysis:
To understand Shylock's character, his motives and his reasoning I have decided to employ the Stanislavsky method 'Inside- Out'. This method means that the actor (or animator) understands the characters internally to understand their motives to then bring a more realistic performance.
Given Circumstances:
Venice 1596 where intolerance of the Jews was a fact of life. By law the Jews were forced to live in the old walled foundry/ 'Geto' which was locked and guarded by Christians at night. If a man wanted to leave the Geto during the day he had to wear a red hat to mark him. Unfortunately the Jews were not allowed to own property so they lent money at interest which was against Christian law. This illustrates the political and religious climate of the time which creates tension between various characters.
Research:
Before this point in the play/ film Shylock lent a Christian, Antonio, a sum of money on behalf of another character. But instead of charging interest Shylock asked for one pound of Antonio's flesh if he comes doesn't fulfil the 'bond' at the appointed time. At this point it is unclear of Shylock's feelings towards Antonio. In his first soliloquy, Shylock says he hates Antonio because he is a Christian but it he might also hate because Antonio's active opposition to money lending (which would make Antonio hypocritical as he ask for a loan- making Shylock despise him even more).
Shylock's character is very hateful at this point in the play because his daughter runs away to marry a Christian boy, who Shylock considers to be an enemy. This might also contributes to his heart hardening against Antonio (who is in finical trouble and can not fulfil the bond) and why he is demanding that Antonio give him his pound of flesh.
In the introduction the 'The Merchant of Venice' by John Russell Brown ( reprinted version 1961) Shylock is described as:
'... an old miserly father he is a comic, as a Jew he is savage and ruthless, as a usurer (money lender) he seeks to ensnare the needy and Antonio, their protector...He is also a man who suffers and triumphs, speaks at times with great nobility and has a 'kind of wild justice' in his cry for revenge.' pg.xlv
Objective:
Shylock's objective in this part of the play/film is to justify his need of revenge, which he might perceive as justice. He wants to communicate that the Jews are the same as Christians and that in this same way a Jew has a right to revenge the same way a Christian does.
'...and if you wrong us, shall we not revenge? If we are like you in the rest, we will resemble you in that. If a Jew wrong a Christian, what is his humility? Revenge. If a Christian wrong a Jew, what should his sufferance be by Christian example? Why, revenge. The villany you teach me, I will execute, and it shall go hard but I will better the instruction.'
Super objectives:
Shylock's constant objective is to seek revenge (or justice) on the Christians for the injustice he feels for himself and his people.
Obstacles:
In the short extract I have chosen Shylock doesn't have any apparent obstacles except his inability to convince the other characters present, and audience, of his right to revenge and that his motives are just.
Beats:
- 1st beat: Shylock turns around to face Salarino as he is asked a question about Antonio
- 2nd beat: he answers the question quietly saying: 'to bait fish withal, if nothing else it shall feed my revenge.'
- 3rd beat: Shylock expands on this last statement becoming loader and surer in his tone.
- 4th beat: come to the climax of the pice and become forceful in his delivery of the words and moves towards camera ' ...and what's his reason? I am a Jew?'
Subtext:
The inner dialogue of Shylock is that he is describing the general behaviour Christians hold towards the Jews but focusses it all on Antonio. it feels as if Shylock is expressing much suppressed anger and frustration of what it is to be a Jew in those times but is focussing it onto one man.
Other Interpretations:
Bellow shows Shylocks Speech being performed by Anthony Ring in Avril Duck's production of the Merchant of Venice (performed at the Tanks Art Centre, Cairns, October 2009). this performance shows an elderly man hobbling around the stage full of frustration but not as angry as Al Pancino's depiction of the character. I thought this was an interesting alternate way of depicting Shylock as it gives him a vulnerability and doesn't make his a typical 'stage villain'
My Morpheus Character:
I decided for the character design to make the character look old but not go completely white. I also used the texture I made before for the old man (week 1 post) to add some interesting coloration around his eyes and lips. To complete the character look I'm going to module a cap and texture it red. I feel it's important that Shylock's character have this garment as it symbolises the segregation of his people and i feel it will add the character's detail and back story.
This basic head mesh was created in Maya with basic topology. To create the extra topology we used the extrude tool which created quad topology easily and efficiently. This mesh was then taken into Sculptris where it could easily be manipulated into any find of face. I decided to model a face based on Julius Caesar from the Asterix cartoons due to the character's exaggerated facial features.
Still using the base mesh at low topology I used mainly the grab tool to pull the face into the basic proportions of the Caesar's face. Only once this was done could I increase the mesh topology and start to model in more detail. As you can see in the final model the mesh is more complex allowing for crease and overlapping flesh.
Finished model:
Face Expressions Exercise:
Using a similar simple mesh and method I modelled using this image as a reference. Then without altering adding to the mesh we had to create different face expressions for the neutral face expression. This was an interesting exercise as it made one think heavily as to what part of the face had to be manipulated to create expressions while still keeping the volume constant.
To create the basic lip sync is to create using 3 passes. Pass 1 ups and downs for the mouth, pass 2 narrows and wide positions and detail them helps create more exact mouth shapes. Even though there is a lot of internal movement of the tongue and teeth ( usually some this detail is added in the 3rd pass) when some one speaks most of this movemetn isn't sence so it doesn't have to be recreated. The Muppets is a good example of how simple up and down movement in sync with a voice can be convincing enough movement for lip syncing.
'You Feeling Alight There Phil?':
This is the first lip sync test I've ever done so found it a very interesting challenge. Do it in 3D means that the computer creates all the interpolation so the only work is to create the key frames. This I found really hard to do. The timing wasn't an issue because the dialogue provides that but it was deciding what mouth positions go with what sound. Unfortunately due to my dyslexia I found this process very hard to do.
After my first attempt I decided to create a rough dope sheet to help distinguish clearly the shape of the mouth to every letter pronounced. Once doing this I could then figure out where the main keys have to go and I felt that the mouth moved in a more realistic way and fitted the audio more than the first test. Once the mouths movements the rest of the face had to be animated to create a sense of overall movement. This was simply moving the nose to follow the ups and downs of the mouth and then doing the same with the cheeks and the chin.
To help me create the dope sheet I used this sheet which outlines the main positions for most of the letters and sounds. the example to the side shows how some of the letters although are shown to hold one position when in the middle of a word become an in-between letters either side of it. for example the 'N' in 'FINE' is shown with mouth closed but in the word 'FINE' it forms an shape in-between the extreme open mouth forming the 'I' and and the closed 'E'.
I feel that this test is a great improvement for the first but there is still room for improvement. In my first test the mouth movement felt too lose due to not enough keys but the final test might have been to exaggerated.
This is the rig formate before any changes are made. The types of changes that can be made are to the size, shape and features of the characteristics.
A little girl, an old man, and a young man:
The texturing on this face was using one of the textures which came the rig so no alterations was made, I swapped one texture for another.
The Little Girl: The original texture (left) was modified in photoshop. I made it paler, made the checks a dark colour and with freckles. This with blue eyes and urban hair added to the girls character.
The Old Man: The face texture was changed in the same why as the little girl. Here I experimented with adding rings around the eyes. The way the UV texturing works means that some parts of the texture are stretched further than others or in directions which are unexpected. This meant that the establishing the direction of the rings took a couple of tries before I was satisfied with the over all look.
For the old man I also wanted to change to colour of the eyes, making them blood shot and foggy with cataracts. Unfortunately the public colour is controlled by another part of the rig which refused to change colour so the pupil had to stay black. I also changed the colour of the teeth using a simple lambert.
Character in poses:
This little exercise allowed me to learn how to use the Morpheus rig and get the characters into different character poses. I had trouble folding the arms of the young man because I originally made them larger so parts overlapped. So I made the arms smaller so they would be easier to move.
The character I have decided to design is the witch form the Brothers Grimm 'Hansel and Gretel'. I first started the design process by looking at the traditional depiction of witches but I wanted to give more of a back story to my character: Why was she eating children? The story was set during a period of faming, probably based on the great faming in germany in 14th century. I wanted to design her to be decreed, physically incapable to feed herself which is why she has to resort to feed on children.
Character Boards:
These panels show the simple design of the witch and images I used as reference in Maya. She has kyphosis: sever curvature of the spine; and arthritic hands and feet. She was a big woman but now she is starving so her ribs are showing and her arms have flesh hanging of the bone.
Witch Built in Maya:
This model was build solely in Maya.
Witch built in Mudbox.
I first made the basic mesh for this model in maya and then exported it into Mudbox where I added more detail to the mesh to allow for more detailed modelling.
Final animation incorporating two walk cycles and a ball and tail.
Ball and tail:
Ball and tail inteacting with it's environment
Walk Cycles:
Ball and Legs walk cycles; normal, limping, skipping and tiptoeing, and Digital Tutors walks; male and female.
Bouncy Balls:
3 different weighted balls bouncing across a plane:
red and yellow ball- hard bouncy ball
white ball- filled with liquid
red and blue ball- hard ball filled with air (basket ball)
This is the animation as it stands. The two walks are established and the main turing point, the owner begin pulled by the dog, is established but is not entirely finished. When the owner gets pulled I want to make the head snap back before he is completely pulled forward by the ball. The right arm still needs to be animated as he moves and the left needs to move up and down slightly in time with the ball's movement.
When the owner comes to a stop I have got him to the position where he has stopped moving. Form there I need to get him to rise up into a standing resting position. In my storyboards I planned to have some POV shots of the owner looking at the ball before it shots off in another direction. I have decided instead to keep it all in one shot as the camera work will be more simplistic allowing me to focus more on the quality of animation.
This cycle is more of a run and as such the stride, timing and height will be different for the first walk. the stride is much wider and the legs lift up higher. Because the dog is pulling the owner the arms aren't in a cycle. The right arm is kept back to maintain balance as the left is being kept forward by the dog. This means that the torso doesn't rotate side to side as much. There will be a lot of hip rotation up and down as the dog will be dragging the left side of the body down.
Hurried walk: 20 frames
For the hurried walk cycle shortened the cycle to 20 frames as the character had be almost if not, running as he gets pulled by the dog. this cycle has many problems. I don't like the back and forth bobbing motion so I will make that less emphasised. The hand movement also need work: the left hand will be moving up and down as the ball jumps but this can only be animated once the ball is added to the scene. the right hand moves too much. In my reference video's my dad's arm doesn't move as much- it remains outstretched as he tries to regain his balance.
Hurried walk: 15 frames
This cycle is greatly improved: I made the cycle 15 frames which gives the cycle a greater sense of speed. The torso movement has lessened but there is still some degree of popping which I want to remove. I have not animated the right arm yet. I have decided that I will animate this once I have my character running through the scene and not animate it as part of the cycle.
The relaxed walk was a mixture of a 'floppy walk' and a walk where my father was interacting with the dog. The weight of the walk will be low in the torso and the walk is mainly lead by the knees. The legs are never fully extended but there are very defined ups and downs.
This walk was a little too stiff for the walk I had in mind. However I liked the posture of the torso and the position of the left arm provided useful reference as to the posture of someone when walk a dog.
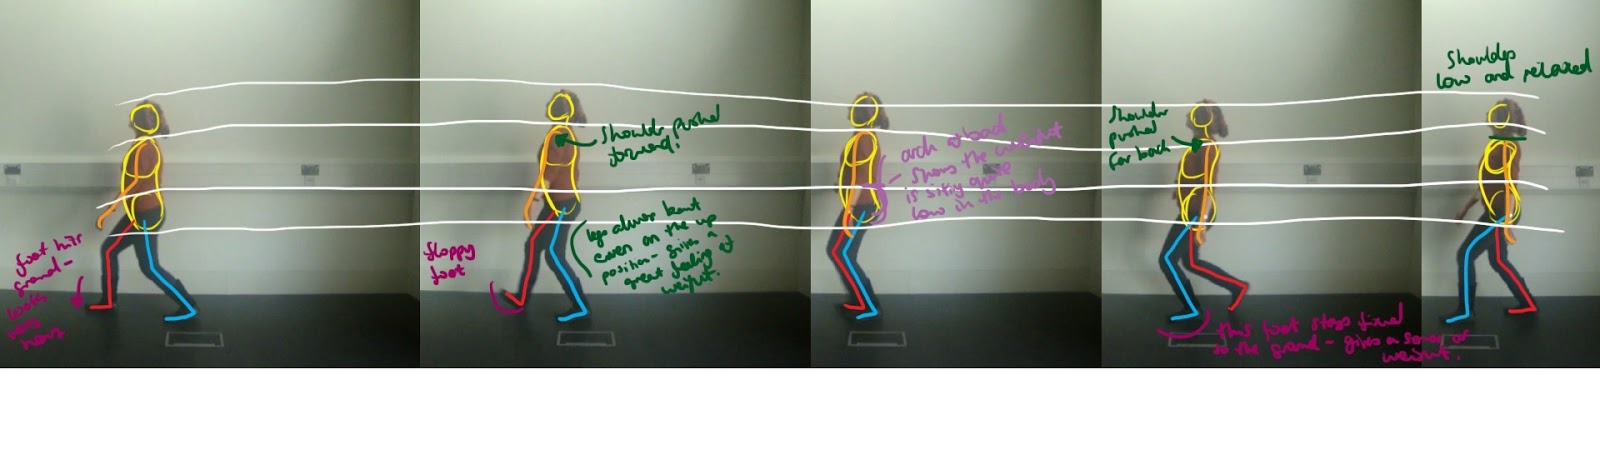
Take 1: 37 frames
This is my first take for my first walk cycle. The walk is meant to reflect a relaxed, leisurely walk and was to feel weighted. The feedback received form Dan was to have more hip sway, lifting the leg more, exaggerate the ups and down and decrease to side to side sway. Also the part of the body leading the walk is the knees so exaggerating this was also needed.
Take 2: 40 frames
In this walk cycle I took on Dan's suggestions and increased the walk cycle to 40 frames matching my reference video's. The feed back received for this walk was that there needed to be more shoulder rotation as the upper torso doesn't move making it walk look stiff. Also the hand movement was far to exaggerated. I had tried to create a feeling of overlap but the rise of the hand was too exaggerated and needs to be lessened. Alterations have to be made to the legs as well. The right rotates when it moves back, thus giving the illusion of the foot sliding.
Final Relaxed Walk Cycle:
This is the final walk cycle with amendments addressing the criticism above. I've added shoulder rotation which is subtly but is no movement made the walk look very ridged. The hand movement and overlap is not as exaggerated as it was before and subsequently looks far more effective. I also exaggerated the ups and downs but made the body overall sit much lower. This made the knees stick out more, leading the walk.
Animating the Ground Plane:
In the digital tutors vides to make the rig walk the ground plane was keyed at the beginning and at the end of a cycle and had no keys in between. This produced as straight line on the graph editor and although the feet didn't slide I felt that the walk was to smooth and that the feet needed to be more planted.
To achieve that I keyed the ground plane to make sure the feet didn't move while on the ground. this resulted in many more keys but the walk looked heavier and weighted.
Following the formative assement were I recived feed bak on my work I decided to make some amendments to my work where it was suggested.
Ball 1: Bouncy ball with a liquid interior
On the first bounce Dan felt that the ball stuck in the air too much. This due to the deformer stretching the ball too much making it look like it was hanging in the air for too long. I changed this by deleting on of the deformer key frames and the ball was deformed less therefore making the bounce look right.
Ball 3: A hard bouncy ball moving across a plane
With the ball moving across the plane Dan felt that there were many issues. The arches were too long, the ball hang in the air giving the ball the appearnce that the ball was activly bouncing forward as if it had a mind of it's own. Also the timing of the bounces were incorrect resulting in the ball speeding up at the end and stopping with a bit of a kick.
To solve the problem of the spacing and the timing I went back to my refernce video and took note of when the ball hit the ground using the audio. Once I had keyed in the down positions in Maya I placed the up positions directly in between. This resulted in a much longer bounce and more smaller bounces at the end occuring at the right speed.
To prevent a kick at the end I decided to add a roatation to the ball (and Ramp Lamber to help see the rotation). By adding roataion to the ball as it bounced and came to a stop really made the movement of the ball look much more realistic.
3 Bouncy balls moving across plane amended.
Below is the vidoe of the three balls boucing with the above two balls amended. The benefit of seeing the balls together allows one to see the differenec in the bounce's timing, spacing and weight/ material.
Ball and Tail
Overall the feed back for this character animation was very good and Dan seemed to enjoy watching the character. The only point which improvment could be pace was the flop of the tail at the end. I had animated the tail as if it was made of light material, imagining the large part of the tail to be made of a lot of hair. Dan however felt that as that was the biggerst part of the tail that it would inded be heavier. As this was the first feed back I'd had form an audience I decided to follow the audiences assumption of tail weight and made the tail heavier. This was simple to amend using the time line, dragging the correct key closer together and then using the snap tool.
Ball and Legs Walk Cycles:
Skipping
The problem with this cycle is that the ball didn't jump high on the passing position. After having done this if felt that the skip had much more energy and pep. I also brought in the feet making them fall close together as I felt that when the were far apart that the weight of the jump was diminished. Furthermore when one jumps and place all their weight on one foot they tend to place their foot under the body to gain maximum stability. By doing this with my skip it felt a more natural way to place the weight.
Tiptoe
With the tiptoe style I tried to create, Dan said that the strides of my character where not long enough had to extend further to give a feeling of exaggerated movement. Also to add to this a sense of cushioning in and out as it bobbed back and forth. So by extending the stride of the leg and experimenting with back and forth motion, and a little rotation I feel the rig moves in a more dynamic way and from a profile point of view defiantly feels more like a tiptoe walk.
Limp
To create this walk I made one stride take longer than another. This created a slight amount of kicking in the characters left leg. Here there was only the question of changing the timing of the keys, by making them more spaced out, making the stride take longer the kick was removed.
This is the finished animation as it stands on the Ball and Tail character animation. I found this project very fun as it allowed me to add some humour to my animation especially with anticipation and prolonging action to increase the sense of anticipation. I would have liked to have been able to animate the tail as an animate object instead of being limp as it would have been a good tool of expression instead of using the squash and stretch which I found quite limiting.
Ball and Legs Walk Cycles:
Ball and Legs Tutorial Walk:
I found this tutorial really useful in understanding the key poses for the legs in a walk cycle and also drew my attention to the importance to the position of the feet. Using the graph editor was particularly useful in making the feet stick and achieving a smooth banking side to side motion. What I would like to do next with this rig is to play around with the walk to give it different rhythms and personality as well as experiment with the squash and stretch deformer.
This walk cycle was the most difficult one out of the three because the knees kept wobbling. In-between the key frames the knees kept moving about and it was really difficult to find a way to stop them, through changing the key frame values or through the graph editor. This cycle was particularly interesting to do because at the passing position the feet are both of the ground. I also decided to extend the number of frames for the cycle to 27 frames so the ball could have more lengthy bounds.
TipToe Walk:
What defines this walk in the up and down motion as it creeps forward. Only once had I created enough contrast between the two extremes only then did the walk look effective. Unlike any of my previous walk the legs were never fully extended which made the walk fun to do as it allowed sense of compression and realise which gave a feeling of a bounce. With this cycle I decided to experiment with the squash and stench deformed on the ball as I noticed when analysing this walk that as I moved up and down I was squashing and extending my body. Again with this cycle I extended the number of frames to 38 to make the walk look slow, measured and purposeful.
Walking with a Limp:
This was very much inspired by the walk cycle form the Walk Cycle Depot (above). Here I exaggerated the rotation on the right hip in order to lift the right leg off the ground. Here I also experimented with different timings. The right leg takes 25fr to take one step where are the left leg takes 11fr. I decided to do this to exaggerate the limp and give the feeling that the right leg can't take any weight so the left leg has to move quickly to take the weight again.
The movement of the upper torso and arms was interesting to do. To create an overlap with the bobbing of the head, chest, back and lower torso all were selected and keyed in to certain positions. Then using the graph editor the key frames where moved along the time line so the keys were out of sync by a frame (see bellow). This showed another fantastic tool the graph editor is and how it can be used to create overlap with a number of components.
Moving the rig from A to B:
As well as the walk cycle the tutorial showed how to make the rig walk forward whilst keeping the timing of the contact positions correct. To create this illusion properly the feet have to stick while the other is moving otherwise it looks as if they are sliding forward instead of pushing it's self forward.
DT Female Walk Cycle:
The four main areas of difference between a male and female walk occur in the arm, knee and feet movement and the hip sway.
The arms are more turned out so that they don't hit their hips which are generally wider than men's. This main adjustment was done on the passing frames, when the arms go past the hips, on the rotate X axis.
The Hip Sway was exaggerated by making the hips move further in the X axis in the down and contact positions. This made the hips 'pop' into place but had a stronger movement that the male walk.
The feet where brought inwards to a more central point and again this was mostly done on the passing position. This made the position of the feet not as wide apart as the male walk. In the male walk at the passing position the foot had moved way from the centre in an almost circling motion. By moving in the feet I felt it helped in exaggerating the movement of the hips.
The knees like the feet were also made to be more central and closer together and in the down positing are keyed to move inwards even further. This I feel also helps to make the hips pop.
The character interaction I plan to have between the DT rig and the ball and tail rig is that of dog and owner. The nature of the human's walk will start off relaxed, clam head faceing towards the sky, possiably looking around as if the character lost in thought and in't paying to much attention to the dog.
The dog however is very excited jumping around in different diratetions but generally traveling forward. The change of passing happens when the ball starts to move faster in a striagter direction and the poor owner is dragged along. The ball suddenly stops almost causing the owner to fall. The last shot is of the ball shooting of in a side diration catching the owner off balance draging him towards a low angled camera.
Storyboards:
Set Layout Plan:
A street with trees to the right of the characters and houses to the left the character are traveling right to left along this layout plan.
Reference Videos:
Here I have two reference videos one looking at mainly the walk of the owner, both casual and then being pulled by the dog. These videos will provide a reference between the two different walk cycles and their postures.
The second focused on the dog and it's movement. Although I won't be using a four legged rig it still is good reference to understand the dogs body language, especially squash and stretch and the posture/action of the tail.
Human Walk Cycles Reference Video:
Dog Movement and Body language Reference:
Background design:
As I have no experimenc in createing an atmospheric enviorment in Maya yet I want to create the enrioment using image planes or possibaly compositing the animation with an alpha layer into aftereffects with photoshop backgrounds. The background bellow is what I would like the street to look like. In a film bellow that is a quick After Effects test where I have placed my DT walk cycle in front of my background. If I were to take this idea forward I would need to find a way of creating a shadow in Maya using various lights to give the characters a sense of presence in the scene other wise they will look like they are flouting.
To create a walk cycle with personality you have to change the positions/ posture and rhythm of the walk. The image bellow form Richard Williams ' the Animator's Survival Kit' shows changing the posture of the character in the passing position can change the nature of the walk. The walk on the left looks like a very depressed character where are the one on the right is leaning back exposing his chest and gives off a more enthusiastic walk.
Analysing Walk Cycles:
The video bellow is from a web site called Walk Cycle Depot which has a number of different walk cycles. I decide to analyse this particular walk cycle as it had a lot of weight and it's rhythm wasn't even as the other walk cycle I have done so far have been.
When creating a charcter thtough a walk there are 6 main aspects to remember which I will use the walk cycle above as an example.
Stride: The stride length is different both in timing and in distance. The right leg starts far behind the main body and though it never goes past the shoulder it has a longer stride then the left leg. The left leg, although it could travel further, stay close to the main body to provide an anchor in the passing position Where the character is literally throwing his weight forward. The timing of the strides are also different. The right leg has to drag the weight of the ball and chain so takes longer to move. The left leg however needs to catch the character (4th image- the character is out of balance) and therefore needs to move faster then the right.
Height: The height of the legs are not very high and the walk is more like a shuffle then a march. In most of the positions both feet are planted on the ground and the legs are mostly bent, with the exception of right leg in the 2nd image.
Arcs: This mainly concerns the shoulders and the drops in the walk. In this walk the shoulders start at a low positions and get pulled up and forward before dropping again. It is this repeated pattern that creates an arch in the walks movement. this walk leads through the shoulders, but mostly through the right shoulder. This can be seen as the character moves it forward and then up before he lifts his feet off the ground.
Posture: The posture of the character can also tell us it's personality particularly in the 5th image. This this contact position the back is almost doubled over with very hunched shoulders. The neck is pointing down with the head nestled between the shoulder facing down. The arms are a very good indicator of the characters mood; they hang limp at his side and only move as a subject of overlap or being lead by the shoulders. Over all the posture tells us this character is tired, very low in mood and exhausted.
Twist: The greatest amount of twist happens in the torso but in this walk there is a great deal of twist in the right hip. The right hip has to shift the weight of not only the body forward but also the ball and chain. It starts rotated out showing the pelvis to camera. It then rotates up and then forward and it brings the right leg up and forward into the passing position. It then drops down and comes up again as the left leg moves forward. This heaving motion, which is also created by the right shoulder gives he walk a great feeling of the height being shifted forwards.
Overlap: Overlap happens mostly in the hands and fingers or in any lose item of clothing, accessory or hair the character might have. For this character the only great amount of overlap is in the hand. In the 3rd image the right hand in pointing back to the body but in the next image as the shoulders are dropping the hand is lifted slightly and points away from the body.
Reference Vidoes:
After having analysed the walk cycle above I decided to create my own reference videos and analyse the different aspects of the cycles.
A Normal Walk:
Skipping:
Hunched Over:
Tiptoeing:
Walking with a Limp/Heavy leg:
Very Floppy/ Relaxed Walk:
Ball and Leg walks cycles using Reference Videos:
Skipping:
This walk cycle was the most difficult one out of the three because the knees kept wobbling. In-between the key frames the knees kept moving about and it was really difficult to find a way to stop them, through changing the key frame values or through the graph editor. This cycle was particularly interesting to do because at the passing position the feet are both of the ground. I also decided to extend the number of frames for the cycle to 27 frames so the ball could have more lengthy bounds.
TipToe Walk:
What defines this walk in the up and down motion as it creeps forward. Only once had I created enough contrast between the two extremes only then did the walk look effective. Unlike any of my previous walk the legs were never fully extended which made the walk fun to do as it allowed sense of compression and realise which gave a feeling of a bounce. With this cycle I decided to experiment with the squash and stench deformed on the ball as I noticed when analysing this walk that as I moved up and down I was squashing and extending my body. Again with this cycle I extended the number of frames to 38 to make the walk look slow, measured and purposeful.
Walking with a Limp:
This was very much inspired by the walk cycle form the Walk Cycle Depot (above). Here I exaggerated the rotation on the right hip in order to lift the right leg off the ground. Here I also experimented with different timings. The right leg takes 25fr to take one step where are the left leg takes 11fr. I decided to do this to exaggerate the limp and give the feeling that the right leg can't take any weight so the left leg has to move quickly to take the weight again.
These studies have been really helpful in improving my analytical skills when looking at a characters walk and will be of great use when designing my own character;s walk.